

|

|

|

|
|
|
 |
|
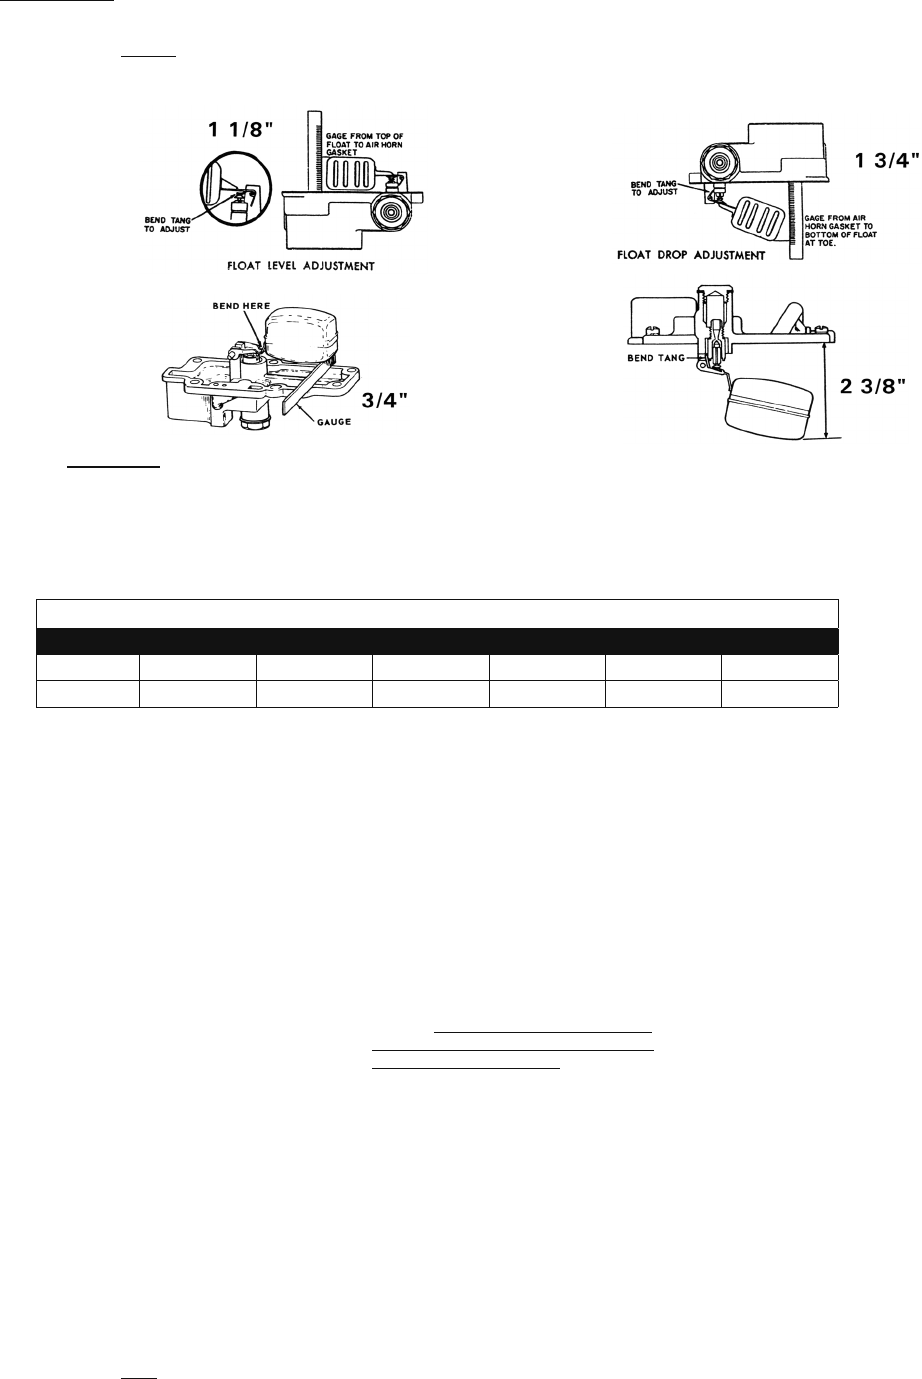
 406 TECHNICAL SECTION Carburetor Settings – Our rebuilt carbs. come with the following new jets. Change as needed. All except secondary carbs = 51 All secondary = 48 Suggested Float Settings – Our experience has shown that the float level (amount float comes up) should be slightly greater than the factory suggestions. This means the highest level of gas in carb. is slightly less and is less apt to flood due to "hot soak" conditions (cold gas comes into carb. and you turn off engine and gas heats up and expands). Basic TUNE-Up Specs – These are just general specs. See Shop Manual for EXACT specs. Spark Plug Gap (torque 15-20 ft. lbs.) 80-95 hp. (low hp.) = . 035" 98-110 hp. = .030" Point Gap New = .019" Used = .016" Dwell Meter = 31-34 degrees (aim for 32-33) Timing – See Shop Manual – The following will give you a general starting point. Most Corvair owners "time by ear". Put in the best gas you plan on running (all 98 hp. & higher require highest octane) and advance timing a little at a time until it just "pings" during the hardest driving and then decrease it by 1-2 degrees. These are just VERY GENERAL starting points (degrees) – see your manual 80-95 hp. 110 hp. 110 smog 140 hp. 140 smog TURBO Standard 4 - 6 12 - 14 4 18 4 24 Powerglide 10 - 14 12 - 14 12 18 4 - - - - - - Losing FAN BELTS? This can be due to several things. 1. Fan belt too wide so it does not fit down into the groove. The widest part of the belt should be about 3/8" and the narrowest about 3/16". Our Ultimate and Otto belt are correct. You do not want the belt too loose or too tight. 2. "Raw sided belt" – The original belts (and our best belts) are "wrapped" with fabric that help keep them from "walking" out of the groove. 3. With the belt off check your belt idler, generator or alternator and fan pulleys to see that they turn smoothly and easily and appear to "run true". Also check pulleys for any notches; even a small notch can chew up your belt. 4. If you have a harmonic balancer check to see that the outer part hasn't shifted so it is not "running true". 5. If your car has belt guides by the idler & fan pulley, they should be adjusted within about 3/16" of the edge of the pulley. 6. Try a different fan belt. Some Corvairs just don't like certain belts. Even if 99% of others do! 7. Maybe you're over revving. (No…not Corvair owners!) 8. If you have a 1960-63 with a steel fan, try the lighter 1964 magnesium fan. Steering Box Adjusting This is from the 1965 Shop Manual and is easier than the 1961. Before attempting steering gear adjustments in an attempt to correct such conditions as shimmy, loose or hard steering, or road shocks, make a careful check of front end alignment, shock absorbers, wheel balance and tire pressure for possible causes. Correct adjustment of the steering gear is ver y impor tant. Only two adjustments are possible but they must be made in the following manner, step by step, in the order given. The lash adjusting screw is accessible through the trunk compartment floor pan plug. 1. Remove pitman arm nut and lock washer and, using Tool J-6627, pull pitman arm from pitman shaft (fig. 3). 2. Loosen pitman shaft lash adjuster screw locknut (fig. 4) and turn the lash adjuster screw a few turns counter-clockwise to remove overcenter load (increase lash). Gently turn the wheel in one direction until stopped by gear and then back off one turn of the steering wheel. CAUTION: Do not turn the wheel hard against the stops when the pitman arm is disconnected since this may damage the ball guides. 3. Pry off the horn button. Using a suitable size socket and a low reading (in. lbs.) torque wrench on the steering shaft nut, measure the torque needed to keep the wheel in motion. This should be between 3 1/2 and 4 1/2 in. lbs. If the torque does not fall within these limits, adjustment of the worm bearing is necessary. 4. To adjust the worm bearings (See Figure 1): loosen the worm bearing adjuster locknut and turn worm bearing adjuster down until there is no perceptible end play in worm. Check the pull at the torque wrench, readjusting the adjuster nut as necessar y to obtain proper pull. Tighten the locknut and recheck pull. If the gear feels "lumpy" after worm bearing adjustment, the bearings are probably damaged and the gear should be removed and disassembled for replacement of the damaged parts. See "Service Operations''. 5. After proper worm adjustment is obtained, and all mounting bolts are securely tightened, adjust the lash adjuster screw (fig. 4). First turn the steering wheel gently from one stop all the way to the other, counting the total number of turns. Then turn the wheel back exactly half way to the center position. The mark on the steering shaf t should be at the 2 o'clock position. Turn the lash adjuster screw clockwise to take out all lash in the gear teeth, then tighten the locknut. Check the highest torque needed to turn the wheel through the center position (fig. 5). Torque should be between 8 and 10 in. lbs. in excess of worm bearing preload, but not more than a total of 14 in. lbs. Readjust if necessary to obtain proper pull. 6. Tighten locknut and recheck. Torque must lie between the specified limits. NOTE: Always make the final lash adjustment in the clockwise direction. 7. Reassemble pitman arm to pitman shaft, first making sure that wheels are straight ahead and that the steering wheel and gear are centered. All except Turbo Turbo 
|
|
Search In Corvair Catalog Content
|
| CLARKS- MORE THAN PARTS. |
|
|
|
What's New |
Clark's History |
Corvair History |
Contact Us |
Customer Service |
Technical Service |
Change of Address
Order Catalog | Catalog Indexes | Technical Tips | Corvair Power | Engine Worksheet | Interior Worksheet | Parts We Buy | Cars, Buy or Sell Order Forms: Parts | Gift Certificates | Ordering Policies | Shipping Charges |
|
|
 Copyright © 1978, 2022 Clark's Corvair Parts, Inc., "Clark's Corvair Parts" and the "Corvair Map" are registered service marks of Clark's Corvair Parts, Inc. 400 Mohawk Trail Shelburne Falls, MA 01370 USA All rights reserved. Main Office Phone: 413.625.9776 Fax: 413.625.8498 |