

|
|
|
|
|
|
|
 |
|
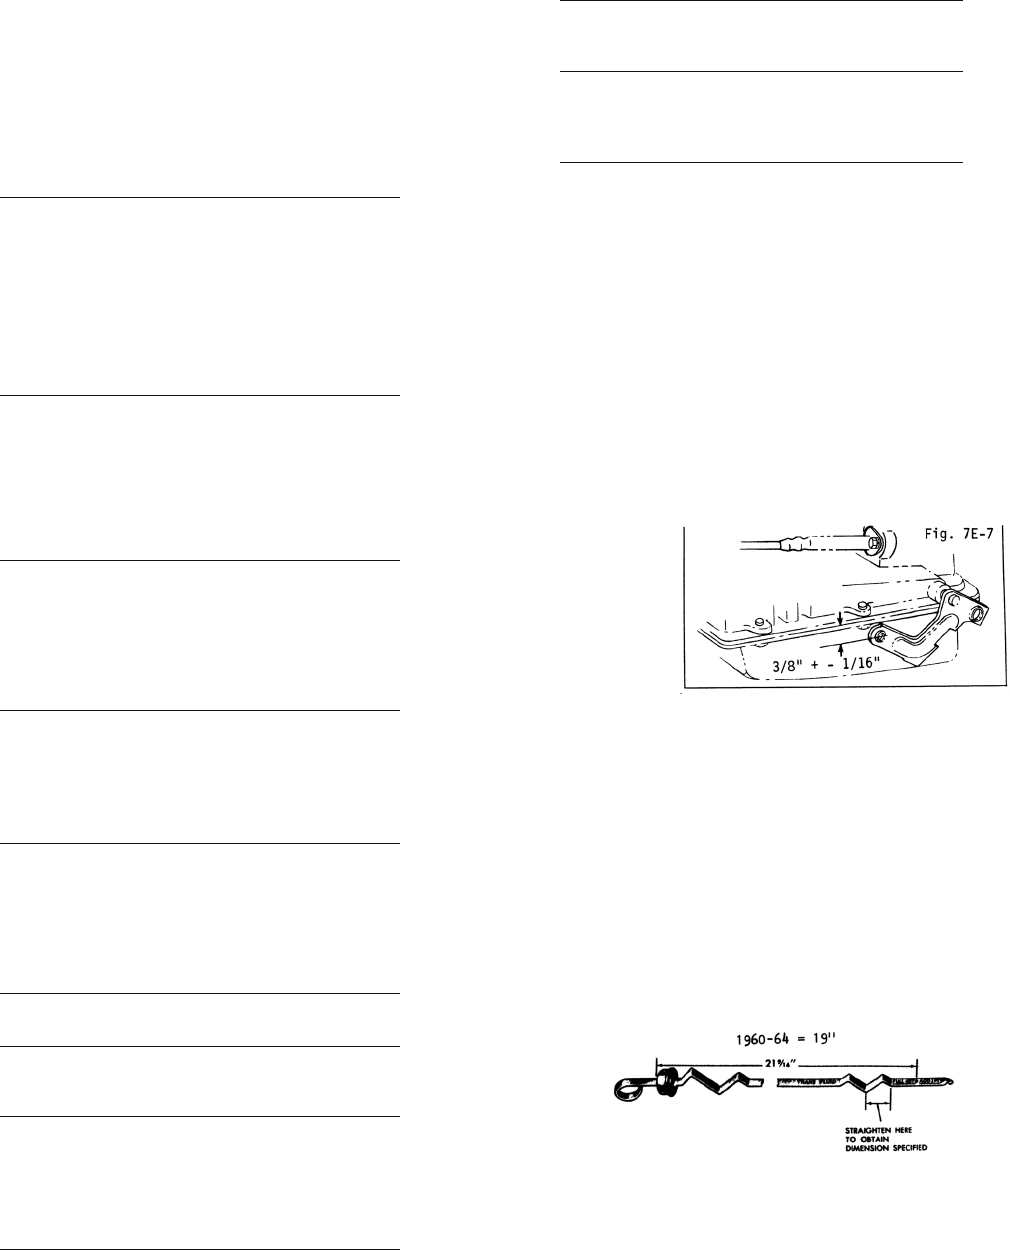 405 Powerglide Diagnosis Guide (from 1961 Shop Manual) No drive in any selector position; cannot load engine. ▪ Low oil level. ▪ Clogged oil section pipe screen. ▪ Broken or disconnected manual valve cable. ▪ Defective pressure regulator valve. ▪ Defective line pressure limit valve. ▪ Front pump defective. ▪ Rear pump check valve, check valve poppet, or rear pump priming ball not seating. Both must occur for possible malfunction. ▪ Front pump shaft disengaged at either converter or pump gear. ▪ Front pump priming ball not seating. Engine speed ares on standstill starts but acceleration lags. ▪ Low Band Partially Applied: a. Low oil level. b. Clogged pickup pipe screen. c. Improper band adjustment. d. Servo piston apply passage blocked. e. Servo piston ring broken or leaking. f. Band facing worn. g. Low band apply linkage disengaged or broken. h. Converter stator not holding (rare). Engine speed ares on upshi. ▪ Low oil level. ▪ Clogged oil section screen or pipe. ▪ High clutch partially applied-blocked feed orifice. ▪ Clutch plates worn. ▪ Clutch seals leak. ▪ Clutch piston hung up. ▪ Clutch drum relief ball not seating. ▪ Vacuum modulator hose collapsed. Transmission will not upshi. ▪ Low band not releasing, probably due to: a. Stuck low-drive valve. b. Defective governor. c. No rear pump output such as stuck priming ball, drive pins not engaged, or defective pump. d. TV valve stuck or maladjusted. e. Maladjusted manual valve lever. Upshis harsh. ▪ Incorrect carburetor-to-transmission TV rod adjustment. ▪ Improper low band adjustment. ▪ Vacuum modulator hose broken or disconnected. ▪ Vacuum modulator diaphragm leaks. ▪ Vacuum modulator valve stuck. ▪ Hydraulic modulator valve stuck. Closed throttle (coast) downshis harsh. ▪ Improper low band adjustment. ▪ Vacuum modulator hose disconnected, broken. ▪ Vacuum modulator diaphragm ruptured. ▪ Vacuum modulator valve stuck. ▪ Engine idle speed too high. ▪ Sticking valves in valve body (pressure regulator or hydraulic modulator valves). Car creeps excessively in Drive. ▪ Idle speed too high. Car creeps in Neutral. ▪ Incorrect manual valve lever adjustment. ▪ High clutch or low band not released. No drive in Reverse. ▪ Manual valve lever improperly adjusted. ▪ Cable linkage adjustment. ▪ Reverse clutch piston stuck. ▪ Reverse clutch plates worn out. ▪ Reverse clutch leaking excessively. ▪ Blocked reverse clutch apply orifice. Improper shi points (see Shi-MPH Chart). ▪ Incorrectly adjusted carburetor-to-transmission. ▪ Incorrectly adjusted TV valve. ▪ Governor defe ctive. ▪ Rear pump priming ball stuck. Oil forced out of ller tube. ▪ Oil level too high causing planet carrier to run in oil and cause foam. ▪ Oil pickup pipe split or not sealed causing air en trainment. Unable to push start. ▪ Rear pump drive gear not engaged with drive pins on planet carrier hub. ▪ Rear pump defective. ▪ Rear pump priming ball not seating. CORVAIR POWERGLIDE SHIFT POINT – MPH CHART UPSHIFTS MPH Minimum Throttle .................................. 10-12½ Full Throttle ........................................... 41-47 Part Throttle (Detent Touch) .................. 34-41 DOWNSHIFTS Closed Throttle ...................................... 8-12 Full Throttle ........................................... 38-44 Part Throttle (Detent Touch) .................. 23-30 Manual Low (Inhibited) ......................... 41-46 Powerglide Cable Installation Install "o" ring seal on cable. Lubricate "o" ring lightly with lubriplate. With throttle rods disconnected from the throttle valve (TV) lever on the transmission, rotate the TV lever its fuII limit counter clockwise and insert cable ball into the slot of the manual lever. Fully seat "o" ring and secure installation by installing cap screw and lock washer. Correctness of installation is easily checked. Once fully tightened, exert a slight hand pressure in the counter clockwise direction and check that the hole in the notched arm of the TV lever is below the transmission oil pan rail (fig 7E-7). If hole is above pan rail, cable installation is faulty and must be rechecked. Powerglide Torque Converter Generally the only problem these give are the starter teeth wear down. However, there is another aspect that you must watch. There is a "nub" on one side that fits into the end of the crankshaft. It is often rusted into the crankshaft when you go to remove it. Best to spray as much rust penetrant as possible down in that area while rotating the torque converter and let it sit overnight. Generally that will dissolve the rust enough (although we have had a few that we have resorted to crow bars). Before reinstalling a torque converter be sure the "nub" is well sanded and that the hole in the crankshaft is clean and the "nub" fits in. Cover with antiseize and install. Powerglide Sick? The following was suggested by a customer. Transmission pushes fluid out overflow? Check fluid return hole. Torque converter over 80,000 miles? It may have lost 10-40% of its efficiency by years of sediments. Have it professionally flushed. Corvair Powerglide Overfilled? Some 1960-69 Corvair passenger car powerglide transmissions may be operating overfilled even though the fluid level is not above the full mark on the dipstick. If transmission fluid is being lost out the vent during operation of the vehicle, measure the distance between the full mark on the dipstick and the top surface of the vent cap. The dipstick should measure the following between two points: 1960-64 = 19" 1965-69 = 21 9/16" Towing A Corvair with Powerglide Trans Over the past 20 years we have talked to many people about this. The general consensus is that it is OK if you follow this. Before towing start the engine, put it in the various gears, stop in neutral then shut off the engine. Every 100 miles stop towing, start up the engine. Go slowly into the various gears, stop in neutral, stop the engine and tow again. If anyone can add to this, please let us know. 
|
|
Search In Corvair Catalog Content
|
| CLARKS- MORE THAN PARTS. |
|
|
|
What's New |
Clark's History |
Corvair History |
Contact Us |
Customer Service |
Technical Service |
Change of Address
Order Catalog | Catalog Indexes | Technical Tips | Corvair Power | Engine Worksheet | Interior Worksheet | Parts We Buy | Cars, Buy or Sell Order Forms: Parts | Gift Certificates | Ordering Policies | Shipping Charges |
|
|
 Copyright © 1978, 2022 Clark's Corvair Parts, Inc., "Clark's Corvair Parts" and the "Corvair Map" are registered service marks of Clark's Corvair Parts, Inc. 400 Mohawk Trail Shelburne Falls, MA 01370 USA All rights reserved. Main Office Phone: 413.625.9776 Fax: 413.625.8498 |
 Prev
Prev 