396
TECHNICAL SECTION
Praise for VITON CRANK SEALS Cal, Just thought I'd drop you a note to let you know
how pleased I am with the Viton crank seal. I have been using this now since shortly after you came out with them, and to this point, I have had
100% lasting success with them, (probably shouldn't jinx myself by mentioning this!). Front crank seals had previously been a "major" warranty
headache for me due to leaks, got to the point where I was seriously considering excluding that one seal from any leak guarantee. I now use the
Viton seal exclusively without worry anytime I have a bell housing off. Feel free to print that in any of your publications.
Larry Claypool
h
MYSTERY LEAK? If your crank shaft has some scratches from installing and removing the pulley, oil can leak past and get slung off around the
attaching bolt/washer. I'm now applying some silicone gasket maker around the end of the crankshaft before installing my pulley to avoid this potential
problem.
Don't Trust that Old Harmonic Balancer!! I did and I'm sorry!!
I had 2 NOS harmonic balancers that were brand new, in boxes and stored at 60-65 degrees. The rubber looked perfect, so I put one on my 64 Spyder
last year. Yes, it was probably 15-18 years old, but it was new!! In 2,000 miles, it had slipped nearly 180 degrees (no timing mark to be found)!! I was
lucky it didn't come apart. If yours is 10-12 years old, really consider replacing it. If you have no idea how old, DO NOT trust the way it looks – REPLACE IT.
REBUILDING AN ENGINE? Be sure to clean all the flashing out of the head passages. If it has never been done to your heads, you may be
amazed at how clogged the heads are. If you can, cut the non-teeth side of a hacksaw blade off; this works well breaking through and then cutting the
opening.
Corvairs do not need LEAD ADDITIVE as the seats and valves were high quality because of the air cooled engine.
When to use Hi-Output Alternators and Replace Generators with Alternators. Most stock Corvairs run perfectly with their
original alternators (65-69) or generators (60-64). If you have higher than normal electrical needs, then you might want to spend the extra to upgrade,
but it is usually not necessary. (See page 84A)
YOU NEED PLASTIGAGE C5879 to check the clearance of the oil pump gears to the cover (a small piece is included with our high volume
pump kits.) You can vary cover gaskets to end up in the .002-.005 range.
OIL PUMP – To prime the Corvair oil pump, rotate clockwise.
DUAL EXHAUST – You must tighten the u-pipe to manifold nuts very tight and retighten after the first 100 miles to hold the muffler in position.
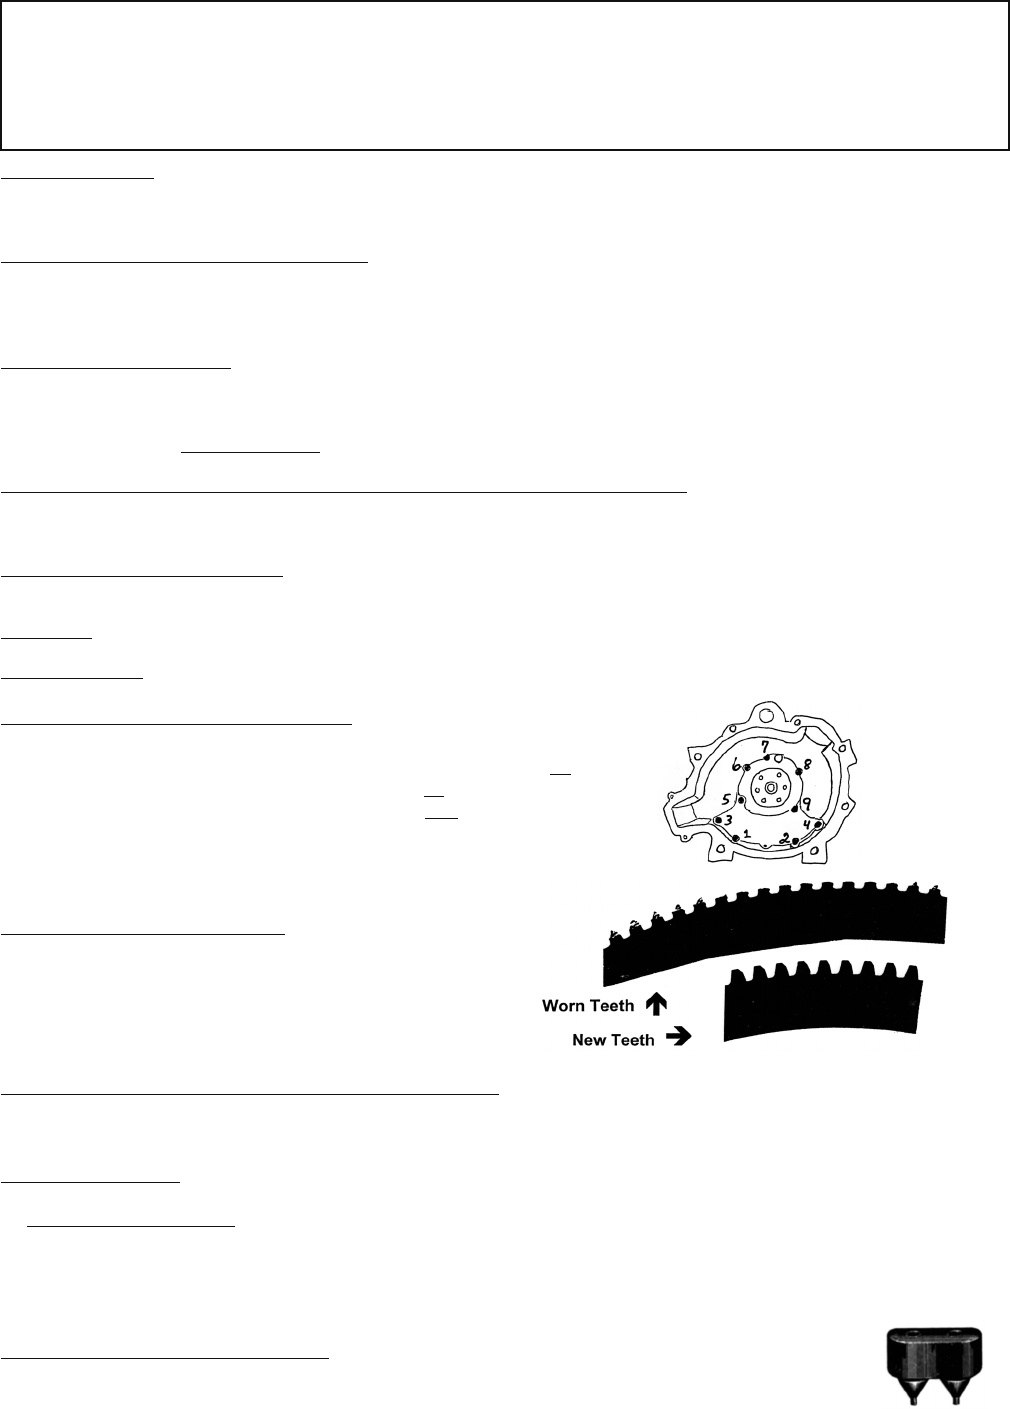
BELLHOUSING TO BLOCK BOLTS
R
BE SURE YOU INSTALL THEM CORRECTLY!
R
1961-69 STANDARDS #1 and #2 long bolt (1 13/16) with shoulder and NO washer
#3 and #4 short bolt (1 9/16) NO washer
#5 thru #9 short bolt (1 9/16) WITH flat washer (0.070" thick)
ALL POWERGLIDES USE WASHERS ON ALL BOLTS.
PG TORQUE CONVERTERS – Check Those Teeth!
The ring gear on the PG is much thinner than on the standards. There are times
when all of the teeth wear exactly the same; to a fine point. Don't be fooled,
they are worn! They should have a "flat" on top about 0.096" across. All of our
rebuilt torque converters have new ring gears installed.
WARNING: NOS DIFFERENTIAL PINION GEARS
We have learned that the last GM pinion gears were not hardened. They only last about 1,000 miles.
If you are going to use some NOS gears, check them with a file. If the file easily cuts –
THROW AWAY!
3.55 & 3.89 GEARS have the same number of teeth but the pitch varies. Double check the gears for correct matching.
My Corvair takes gas very slowly – What's wrong? Cal can remember when they were new that they "took gas" slowly and would often "gush
back". This was even more pronounced on the 1960-64 models. I assume it is a defect in the venting design. Some current gas pumps seem to
dispense "bubbly" gas and are often set very fast (to process cars faster?) I've even given up on some pumps and moved on. Solution – pump
as slowly as you can, sometimes it helps to install the nozzle "upside down" (opposite of the normal way to insert into inlet) & still pump
slowly.
WHY HOLES IN RUBBER BUMPERS? Almost all rubber bumpers have a "hole" or "slit". This is to aid in installation.
If there is a round hole, use a blunt end punch to push into the hole and extend the tip into the hole (do not push so hard you
break off the tip). Bumpers with "slits", use a wide blunt object.


